Posted on Jun 3, 2014 in Conference |
Sean Young, PhD, MS1, Jason Chiu, MS1
1Department of Family Medicine, University of California, Los Angeles
Journal MTM 3:1S:1–3, 2014
DOI: 10.7309/jmtm.3.1S.1
Abstract
Use of mobile technologies for HIV prevention and care is no longer a promise, but a reality. From 2006 to 2009, a simple search of technology-related HIV studies yielded 1,147 results on PubMed and 274 results on PsycINFO. The number of technology-related HIV studies grew substantially in the next four years, as from 2010 to 2013 there were 1629 on PubMed and 407 studies on PsycINFO. These findings suggest a surge of interest in the field of technology use in HIV prevention and care research.
In response to this growth, the Center for HIV Identification, Prevention, and Treatment Services (CHIPTS) at the University of California, Los Angeles (UCLA) hosted the “Innovative Use of Technology for HIV Prevention and Care: Evidence, Challenges and the Way Forward” conference on January 23rd, 2014. Bringing together interdisciplinary researchers, community practitioners, clinicians, policy makers, technologists, and representatives from governmental and funding agencies, the conference sought to establish a collaborative framework for individuals to share their knowledge and experience in technology-based HIV prevention and care with each other.
Although the conference included information on different types of technologies, there was a particular emphasis on the role of mobile technology in HIV prevention and care. Popular mobile technologies are typically described as belonging to one or more the following categories: 1) cell phones, 2) native and cloud-based applications, 3) social media, and 4) mobile websites. Individuals differ in the way they use mobile technologies to communicate with each other, making it important to study the various ways in which mobile technologies can be used for HIV prevention and care. For example, cell phones facilitate multiple forms of communication, such as phone calls, short message services (SMS)/texts, and multimedia messaging services (e.g. video and picture texts)1. In the U.S., Youth (ages 18 to 29) communicate with each other predominately through SMS2, and recent HIV interventions targeting youth have utilized SMS to reduce substance use and increase HIV testing3,4.
The recent explosion in the use of social media can have a tremendous impact on HIV research, because these technologies can serve as platforms not only to reach a large number of at risk individuals but also to gather data on the behaviors of these individuals. Social media is defined as technologies, platforms, and services that enable individuals to engage in communication from one-to-one, one-to-many, and many-to-many5. In 2013, 73% of adults and 80% of teens used some form of social media6,7. There are many different types of social media, including 1) social networking sites (e.g. Facebook and MySpace), 2) blogs (e.g. Word Press or Tumblr), 3) microblogs of real-time communication (e.g. Twitter), 4) forum/bulletin boards (e.g. WebMD and Yahoo Answers), 5) social games (e.g. FarmVille and Mafia Wars), 6) media sharing (e.g. YouTube and Instagram), and 7) geosocial networking (e.g. Grindr and Jack’d). There exist different patterns of social media use based on socioeconomic, regional, and language factors, and before incorporating these technologies, researchers should understand these trends and how they impact HIV risk. For example, in the U.S., racial/ethnic (African Americans and Latinos) and sexual (e.g. gay and bisexual) minority individuals were found to be the most avid social media users8,9. Moreover, many African American and Latino men who have sex with men (MSM) have also used online social networks/geosocial networking apps to meet sexual partners to avoid potential stigma10,11. Taking into account information on patterns of social media use is important in learning how to craft HIV interventions and studies using social media among at-risk groups.
This conference served as an opportunity to introduce individuals to the latest mobile and social media technologies, and demonstrate research on how technologies can be used to study and address HIV among at-risk communities, along with a focus on the ethical and business-related issues associated with these approaches. The objectives of the conference were: 1) to present the most recent research findings and trends in HIV/AIDS and technology, 2) to increase the capacity of participants to develop, to implement, and to evaluate effective and evidence-based HIV/AIDS interventions with technology in clinical, research and community settings, and 3) to bring together researchers, clinicians, and technologists and to foster interdisciplinary collaborations on innovative way to improve HIV/AIDS prevention among at-risk communities.
The following topics emerged from the conference that can be used as a reference for the current state of the field, including research, community-based practice, and ethical considerations: 1) Social media and mobile technologies are increasingly being used by HIV researchers: A number of presentations focused on the use of mobile technologies, including using them as methods for recruitment, interventions, and data collection. Because of the increasing use of social media among populations at risk for HIV and highly-affected by HIV (e.g., minority MSM), researchers should continue exploring innovative ways to make use of these technologies for HIV prevention and care. 2) Community-based organizations and clinics are receptive and interested in applying social media and mobile technologies to HIV prevention and care: We heard from clinic senior management who described their interest and enthusiasm in using mobile technologies to address disparities in HIV prevention and care. Local organizations are interested and willing to partner with academic researchers on this work. 3) The ethical considerations around using these technologies for HIV prevention and care are only beginning to be explored: Our ethics panel conversation was focused primarily on a mobile application related to individuals affected by HIV and the ethical concerns of using mobile applications for HIV prevention and care. It was an initial step in providing a conversation on this needed topic and highlighted the interest and importance in establishing guidelines12 for safety and confidentiality in technologies that might increase HIV risk, as well as those that are used for HIV prevention and care. This special issue of the journal is dedicated to providing the readers with the abstracts from the presenters of the conference.
References
1. Maximizing Mobile. Washington D.C.: The World Bank, 2012.
2. Duggan M. Cell Phone Activities 2013. PEW Research Center, 2013.
3. Reback C, Grant D, Fletcher J, Branson C, Shoptaw S, Bowers J, et al. Text Messaging Reduces HIV Risk Behaviors Among Methamphetamine-Using Men Who Have Sex with Men. AIDS and behavior. 2012 2012/10/01;16(7):1993–2002. English. 
4. Cornelius JB, Dmochowski J, Boyer C, St. Lawrence J, Lightfoot M, Moore M. Text-Messaging-Enhanced HIV Intervention for African American Adolescents: A Feasibility Study. Journal of the Association of Nurses in AIDS Care. 2013 5//;24(6):256–67.
5. Social Media [cited 2013]. Available from: http://www.britannica.com/EBchecked/topic/1425043/media-convergence/310798/Social-media.
6. Duggan M, Smith A. Social Media update 2013. Washington, D.C.: Pew Research Center, 2013.
7. Madden M, Lenhart A, Cortesi S, Gasser U, Duggan M, Smith A, et al. Teens, social media, and privacy. Washington, D.C.: Pew Research Center, 2013.
8. Smith A. Technology Trends Among People of Color. Pew Research Center, 2010.
9. Harris Interactive. Gays, Lesbians and Bisexuals Lead in Usage of Online Social Networks2007 October 24, 2008. Available from: http://www.witeckcombs.com/news/releases/20070102_socialnetworks.pdf.
10. Young SD, Szekeres G, Coates T. The Relationship between Online Social Networking and Sexual Risk Behaviors among Men Who Have Sex with Men (MSM). PLoS ONE. 2013;8(5):e62271.
11. Rice E, Holloway I, Winetrobe H, Rhoades H, Barman-Adhikari A, Gibbs J, et al. Sex Risk among Young Men who have Sex with Men who use Grindr, a Smartphone Geosocial Networking Application. Journal of AIDS & Clinical Research. 2012;3.
12. Young, SD. Recommended guidelines for using social networking for HIV prevention research. AIDS and Behavior. 2012; 16(7), 1743–5.
Posted on Apr 25, 2014 in News |
The most recent issue of JMTM included an editorial on clinical photography. One keen reader, Dr John Davis, a Junior Opthalmic Resident at JIPMER has compiled an interesting “how to” article summarising some practical tips.
While the debate on the ethics and legalities of taking clinical photos remains a debated topic, this guide is aimed at increasing the quality of the images, if you do decide to take them.
Guest news post below.
Application of Smartphone Devices in Ophthalmic Photography
Dr John Davis
We live in an age where technology is both advancing fast and becoming more accessible. Smartphones and Mobile Devices is one area where this rapid growth is very visible. The availability of cheaper, faster and more capable mobile computing devices has led to a lot of innovations in every field where it can be applied. Smartphones are becoming ubiquitous, with every Tom, Dick and Harry owning one.
The camera is one of the main features of a smartphone today. Compared to the early days of camera mobiles, smartphone cameras now are quite good for all practical purposes. Also, the device being always available and portable is more important than having the most advanced camera.
Clinical photography
While the built – in camera Apps are quite adequate for most people, it would be wise to download and install a more advanced camera software for your mobile to allow better control of the lighting, focus, exposure, white balance and other settings.
I would suggest Camera FV-5, ProCapture, Shot Control for Android. Similar software are available for iPhone and Windows mobile and even Nokia(Symbian and Java) too.
Always remember to have adequate lighting (preferably daylight), plain good-contrast background, good focus on the area of interest. Make sure to frame the picture including background, capture at maximum resolution, and take multiple photographs. Use zoom sparingly, especially digital zoom. Go closer to the subject instead of using digital zoom.
When taking before-after photographs, try to take with the same background and lighting. Same clothing and hairstyle would also help, if feasible. Make sure the zoom and other parameters, including exposure and ISO, is also same.
Later, editing can be done to crop out unwanted parts, adjust the resolution and filesize, adjust the background color and delete unwanted photos. Never worry about wasting space on digital photos. It is not like film where every snap counts.
External eye photography
The first and obvious role of an ophthalmologist’s camera/mobile is to take clinical photographs of interesting cases. This might be for future reference, for getting a second opinion, to visually see the change on follow-up, to convince the patient of the pathology, for tele-ophthalmology purposes, for measurements, for legal documentation, etc among other things.
Make sure to take photos with adequate lighting and with good focus(most apps have touch-to-focus an area of interest). Change the focus to Macro mode for taking close up photographs. ISO settings and exposure settings help if you know what you are doing.
Keeping the camera steady is important, and resting your hands against a solid object would help keep it steady. Lighting should be from behind the camera in most cases. An on-screen histogram can show information about bright and dark areas(available in some apps) and make sure to take photos from different angles
Slit Lamp photography
One of the most important, extremely useful, but expensive equipment a young ophthalmologist needs is the slit lamp biomicroscope. It has innumerable uses in ophthalmology, and it is always better to get the best in terms of the optics and capacity for add-ons. If there was a way to get the digital imaging capability of higher end slit lamp microscopes without burning a hole in your bank account, it would be awesome, wouldn’t it ?
Well, many of us might have tried to take photographs through the eye-piece of the slit lamp or other microscopes and partially succeeded, getting good photos once in a while. This works quite well for taking an interesting photo at short notice. We just have to make sure to hold the mobile/camera steady and centered. Adjust the camera forward and backward till the entire field is filled with the image. Turn off the flash, reduce the exposure, touch-to-focus, wait for the white-balance and auto-ISO to adjust to the light and only then click the photo.
To make the job easier, several people have made slit-lamp adaptors for mobiles which is basically a piece of plastic to hold the mobile steady and at the correct distance. You can make your own using discarded bottle caps of the correct size to fit the slit-lamp eyepiece. Readymade ones are also available for sale. For those who know about 3D printing, note that LVPEI has designed and released some adaptor designs on Thingiverse for download and 3d-printing(which is cool, if you have access to a 3D printer).
Once the mobile is in the slit lamp adaptor, you can much more conveniently adjust the advanced camera settings like ISO, exposure and light metering. You can adjust the brightness in the slit lamp, move it forward and backward to focus, all while looking at the image on the phone screen(no need to look through the eyepiece yourself). Try out all combinations of settings and different magnifications and even take videos where necessary.
You can take photographs of lesions on diffuse illumination, slit beam illumination, maybe even specular reflection if your slit lamp and camera are good enough. Cataract grading can be photographically documented, hypopyon, hyphaema can be measured and documented. Corneal ulcers can be followed up with successive photographs. Applanation mires can be photographed. Gonioscopy can be photographed and videographed. A good collection of gonioscopy videos is available on gonioscopy.org . Add your videos to the collection. Fundus examination with 90D or 78D lens can also be photo or videographed.
The same principles can be applied to take photos or videos through all the instruments with an eyepiece, taking care not to damage the lenses. Photographs can be taken through manual keratometers, operating microscope, and some ophthalmoscopes like panoptic which have a large eyepiece.
Indirect fundus photography
Next, let us see what we will need to take a fundus photo without a slit lamp and 90D. We will need ONLY a 20D lens, steady hands, and obviously the mobile/camera.
Just like doing indirect ophthalmoscopy, you can use the mobile as the light source and eyepiece(headset) and focus using the 20D lens. For getting the co-axial illumination, one technique is to turn on the LED flash of the phone and then using the camera. In Samsung phones, just turn on “assistive light”, and then use the camera. Another technique is to use some advanced camera software which allows you to keep the LED “ON” while focusing the photo(but not the default camera app). Yet another technique is to simply take a video with the flash “ON”. The video mode keeps the flash “ON” continuously and you can capture a view of all quadrants in one shot. But the clarity in video may be less than the best, and extracting the photos would mean taking screenshots or frames using a separate software like VLC.
To make the process of indirect fundus photography easier and more reliable, Robert Chang et al developed a plastic adaptor to hold the 20D lens at the correct distance in front of the mobile. They have named it eyeGo and expect to release it as a 3D printable format just like GANANT from LVPEI did for the slit lamp adaptors.
Direct fundus photography
There are now portable fundus cameras in the cost range of Rs 4 lakhs, which work just like a direct ophthalmoscope. The Welch Allyn Panoptic ophthalmoscope has an extra add-on to fix an iPhone onto the eyepiece to take photos. We could do the same for any mobile or camera by making sure it fits snugly onto the eyepiece. It might be possible to fix a mobile/camera to a regular direct ophthalmoscope too, but the eyepiece is so small that it has to be centered well to get a usable image.
3 D photography
With the advent of cheaper 3D TVs, 3D mobiles, 3D laptops and other 3D viewing techniques, stereo-photography is another technique which is becoming feasible and practically usable. Stereo photographs are useful not only in fundus photography, but also slit lamp photographs, eye surgery videos and even clinical photographs. It is very much possible to take 3D photographs even with a regular smartphone camera. You just need the right software and technique.
For clinical photographs, you can use the Inverse Panorama(Object movie) camera mode which is there in the default camera app in Micromax and Xolo phones. Basically, it takes a video while you revolve your camera around an object/subject. And when you play it you can scroll side to side giving you a perception of depth. The files are saved as MPO files which is a standard 3D photo format playable on 3D TVs.
Another software which does essentially the same thing is “Easy 3D Camera”, but you have to make it click each individual photo after moving the mobile by few degrees at a time. This software also has the option to view the photo in various pseudo-3D modes as well as using Red-Blue Glasses if you have them. Try the wiggle mode – it is a simple yet effective pseudo-3D mode for all practical purposes. Google for wigglegrams if you want to see examples. There are several other software for taking 3D photos from regular smartphones, most of which take only 2 images (left and right eye views)
Slit lamp photography in 3D is more difficult, but basically, if the subject can stay still, using the 3D photo software, take the left image through the left eyepiece and the right image through the right. The additional depth perception will definitely help in diagnosis over a standard 2D photograph.
3D fundus photography is supported by many desktop fundus cameras. Some have simultaneous left and right image capture, but most need you to take a left image first, followed by the right image after moving the camera around 4 mm to the other end of the pupil. Doing the same in mobile photography appears to be very difficult at present.
Many of you might have heard of eye surgeries being shown in 3D in special conferences, or even in your own institute if you are lucky. 3D eye surgery videos are also available on youtube. Just go to Youtube and, after a search, select Filters > Features – 3D. There are many methods to view the 3D, of which I would suggest Red-Blue Glasses if you have them, or Mirror split mode if you have a small mirror. Parallel or cross eyed if you have that much accommodation power. If you do have a 3D TV or 3D laptop, full color proper 3D is available to you.
That is all for now. Do send me your comments and ideas at johndavis AT JIPMER (D0T) net.
John Davis
JIPMER
Posted on Mar 11, 2014 in News |
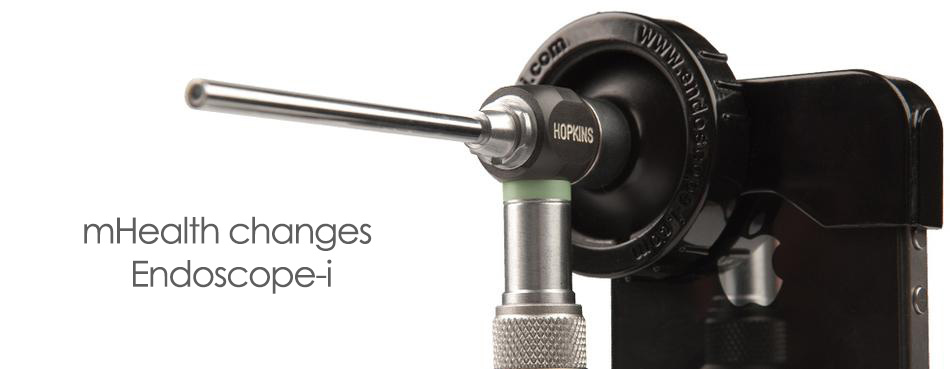
Endoscopic procedures are getting an mHealth overhaul with a UK based company developing fibre optic endoscope attachments for the iPhone. Endoscope-i (company name) has produced a specific rigid endoscope, light source and adapter that can be coupled with a custom case for iPhone 4/5/5s which acts as the screen for the device. The company isn’t just stopping there: it has released specific iOS apps that can take the image from the phones camera module and optimise the image quality for endoscopy to give optimal performance for the set up.
The rigid endoscopy can be used for ENT as well as veterinary applications in place where mobility is required or access is an issue. To demonstrate the potential of this technology, the company has already sponsored medical teams to conduct clinics in remote Nepal. An interactive map provided by the company shows that the endoscope-i system is already being used in countless far ranging locations from Germany to Argentina.
Several posters and other scientific research is already being conducted on the utility of the device. With more time, this device could become a well validated tool in the modern mHealth arsenal.
Sources:
Endoscope-i Home page http://endoscope-i.com/index.html
Interactive map: https://mapsengine.google.com/map/viewer?mid=zeauNUAeYn6k.k7JrVT9cXnC4&cid=mp&cv=LcyK8MK1VlU.en
by Raffy Halim
Posted on Mar 6, 2014 in Featured |

The Editorial Board at the Journal of Mobile Technology in Medicine is proud to present Volume 3, Issue 1, published in March 2014. Mobile technology in Medicine is a rapidly developing area, and we hope to continue accelerating research in the field. We look forward to your submissions for Issue 2.
Posted on Mar 5, 2014 in Original Article |
David Myung, MD PhD1, Alexandre Jais, MS1, Lingmin He, MD MS1, Robert T. Chang, MD1
1Byers Eye Institute at Stanford, Stanford University School of Medicine, Stanford, California
Corresponding Author: viroptic@gmail.com
Journal MTM 3:1:2–8, 2014
doi:10.7309/jmtm.3.1.2
Background: Smartphones with high quality photographic and video capabilities are now ubiquitous. However their utility for documenting ocular pathology has been limited by the optics, magnification, and lighting control required to capture key anatomic details of the eye. While various adapters have been designed to attach a smartphone to a slitlamp to obtain clinically useful photos, we sought a way for practitioners to achieve similar photos using only their existing smartphones with minimal additional hardware.
Methods: We report the design of a simple, point-of-care optical adapter for imaging the anterior segment that combines a low-cost macrolens, LED external light source, and a universal attachment system for use with all smartphones. The adapter is easily attached and detached from a phone in seconds and is small enough to fit in a pocket when not in use.
Results: A series of anterior segment photographs were obtained with the adapter that satisfactorily portrays a wide range of pathology of the eyelids, conjunctiva, cornea, iris, and lens without the need for a slitlamp. The external LED adjacent to the macrolens was key in creating a single light reflex that eliminated reflections on the cornea caused by ambient light.
Conclusions: A simple, low-cost smartphone adapter can provide useful clinical information regarding the appearance of the lids and lashes, the clarity of the cornea, the state of the conjunctiva, the shape of the pupil and health of the iris, and the presence or absence of a hyphema or hypopyon. This may be useful for urgent triage and teleophthalmology in various settings.
Posted on Feb 28, 2014 in Original Article |
Jan Bond Chan, (MBBS)1,2, Hao Chi Ho, (MBBS)1,2, Nor Fariza Ngah, (MBBS, MS Ophthal)1, Elias Hussein, (MBBS, MS Ophthal)1
1Department of Ophthalmology, Hospital Selayang, Malaysia; 2Department of Ophthalmology, Hospital Universiti Sains Malaysia
Corresponding Author: janbond@hotmail.com
Journal MTM 3:1:16–22, 2014
doi:10.7309/jmtm.3.1.4
Online Appendix
http://www.youtube.com/watch?v=jwq7nDwgxa0&feature=youtu.be
Video 1: Video of manufacturing and assembly of the device with example of usage.
Link to get raw material
http://www.daisojapan.com/p-20209-eva-cushion-d315-in-4-pcs-12pks.aspx
Introduction
In the Ophthalmology setting, taking pictures of the anterior segment is of crucial use for ophthalmologists in their daily practise. Ophthalmologists relies heavily of anterior segment camera for recording of progression of disease, documentation for case presentation and discussion, referrals to colleagues or subspecialty clinic and education for junior doctors and patients.
A conventional slit lamp camera is usually used for taking good quality pictures of the eye. The problem with slit lamp camera is that it is expensive and usually immobile.
The use of the smartphone in ophthalmology is more common than ever before1–5. Although most ophthalmology clinics are equipped with slit lamp but not all clinics are fortunate enough to be equipped with a high quality anterior segment slit lamp camera. Smartphones are usually incorporated with high resolution cameras which are commonly used by ophthalmologist capture pictures of the anterior segment of the eye 1–5. There are several commercially available smartphone adaptors to a slitlamp but they are expensive and is specific for certain slit lamp brands only6. We are writing to introduce an easy method to produce and use your own smartphone as a slitlamp anterior segment camera – Do it yourself (DIY).
Advantages of smartphone slit lamp camera
Cost saving and maintenance
Conventional slit lamp camera is expensive costing at about USD 15,000.00. The commercially available smartphone slit lamp camera adaptor (eg. EyePhotoDoc, Zarf iPhone Adaptor, Magnifi iPhone adaptor, Steady iPix Telescope Photo adaptor for iPhone, Keeler portable slit lamp, iExaminer, Tiger Lens and Skylight) ranges from USD 75.00 to USD 520.00. The estimated cost for a DIY smartphone slit-lamp adaptor is USD 15.00 (Refer Table 1) which reduces the cost significantly. A conventional slit lamp camera needs to be serviced and maintenance needs to be done which incurs additional cost to the ophthalmologist. By using the smartphone slit lamp camera, there is virtually zero maintenance.

Table 1: Things needed to built a smartphone slit lamp camera adaptor
Portability
In comparison to the conventional slit lamp camera, the smartphone slit lamp camera is easily portable. It fits into a pocket and when it is needed, it can be easily mounted to an already existing slit lamp during routine examination.
Ease of use
Conventional slit lamp camera is usually placed in a special room and not easily accessible but with the smartphone slit lamp adaptor, it can easily be used in any slit lamp at anytime.
Patient will be explained of the anterior segment photography and consent will be taken.
Ease of Referrals
By using the smartphone slit lamp camera, pictures taken can be shared easily and securely to another colleague for further management or opinion. It can also be used by general practitioner who has a clinic equipped with a slit lamp.
How to DIY (do it yourself) a smartphone slit lamp camera
Determine the focal point of your smartphone by placing the camera aperture directly opposite the eye piece of the slit lamp making sure that placement is centred. The distance between your smartphone and the eye piece of slit lamp will be the focal length of your smartphone. This determines the thickness of the sponge you will be using for sponge Section B (Refer to Figure 1). The focal length for iPhone 4,4s,5, and 5c and 5s is 1.0cm and the focal length Samsung Galaxy Note I, II and III is 0.75cm. Figure 2 shows a completed DIY Smartphone Slit Lamp Adaptor.

Figure 1: Blueprint of smartphone slitlamp camera

Figure 2: Smartphone Slit Lamp Camera
Prepare materials of sponges, super glue and surgical knife (Refer Figure 3, Picture 1). To make Section A sponge (Mounting of slit lamp), 1cm thick hard sponge is first measured by removing the eye piece from the slit lamp (Refer Figure 3, Picture No. 2). Use hard sponges or polystyrene that are 20mm wider than the eye piece so that the rim of the sponge is 10mm wide (Refer Figure 1, Sponge Section A). The author suggest to use Ethylene Vinyl Acetate (EVA) material as it is firm yet does not damage the slit lamp eye piece. Using the eye piece as a guide, a line is drawn using a pen for Section A – use the slit lamp eye piece (Refer Figure 3, Picture No. 2).

Figure 3: Steps of preparation of smartphone slitlamp adaptor
To make Section B sponge(the focal length of your smartphone), another 1cm thick hard sponge is used and measured with a small coin large enough for the smartphone camera hole (Figure 3, Picture No. 3). Caution needs to be taken during the measuring of the sponge making sure that the eye piece is in the centre.
All the sponges measured are then cut-to-fit the slit lamp eye piece and the viewing hole of smartphone camera (Refer Figure 3, Picture No. 4).
The sponges are then glued together using super glue using two to three pieces of sponge to form Section A and one piece of sponge to form Section B (Refer Figure 3, Picture No. 5–7). Attach the glued sponge to slit lamp after it is dry (Refer Figure 3, Picture No. 8).
The combined sponges are then glued to the smartphone cover by first marking the sponge (Refer Figure 3, Picture No.9). The smartphone is then inserted into the smartphone casing and then aligned with the slit lamp eye piece. Minimal amount of super glue is to be applied on the sponge to avoid spillage (Refer Figure 3, Picture No.10). Care is to be taken to ensure that the viewing hole is centred otherwise the end product will not be well aligned. All smartphones are generally suitable for mounting to the slit lamp (Refer Figure 4).

Figure 4: The finished products with different types of smartphones
The smartphone camera adaptor is then mounted to slit lamp and ready to be used. With the help of a VGA or HDMI cable of the smartphone (available commercially), we may also display the photo taken through a LCD projector, monitor or even an LED/LCD TV. Not only it can show live pictures but also the possibility of capturing videos and replay it and can be shown to the patient (Refer Figure 5).

Figure 5: An innovative way to display anterior segment pictures through LCD projector, monitor or LED/LCD TV
How to use the smartphone slit lamp camera
After mounting the adaptor to the slit lamp camera, one may use the built-in camera app in your smartphone and just snap pictures or video as desired. The camera flash should be disabled.
Zooming in/out: It is recommended to use the slit lamp magnification for zooming in and out instead of the camera app as the quality of picture may reduce (Refer Figure 6).

Figure 6: Different lighting and zooming of anterior segment pictures
Background lighting: It is recommended to switch on the room lights during picture taking. The quality of pictures improve with some additional background lighting (Refer Figure 6).
Diffuser: Some slit lamps comes with a diffuser which can be used to diffuse light if the ophthalmologist wishes to take pictures of the entire eye without slitting the light source. This gives a diffuse lighting to the eye. Refer to Figure 6 for detail.
AE/AF Lock: The picture quality may be increased by controlling lighting of the smartphone camera manually. AE (Auto Exposure) and AF (Auto Focus) lock enable the ophthalmologist to lock the exposure and focus to only on specific locations and lighting needs.
Quality of the pictures are comparable to the commercially available anterior segment camera (Refer Figure 7 & 8).
 and conventional anterior segment camera (bottom) in a 20 year old patient with corneal foreign body. Picture A shows initial presentation. Picture B shows post-removal of corneal foreign body with retained rust ring. Picture C shows post removal of rust ring with corneal scar")
Figure 7: Sample pictures showing head to head comparison between Smartphone Camera (Top pictures) and conventional anterior segment camera (bottom) in a 20 year old patient with corneal foreign body. Picture A shows initial presentation. Picture B shows post-removal of corneal foreign body with retained rust ring. Picture C shows post removal of rust ring with corneal scar

Figure 8: Samples of pitures taken with DIY – Smartphone Slit Lamp Camera
Conclusion
In the era today, most doctors are equipped with a smartphone which can help us not only in our daily lives but also in our work. Smartphone photography is something simple and yet very useful in the world of ophthalmology.
Though there might be concern regarding patient’s confidentiality when pictures taken are stored in the doctor’s personal smartphone, these problems may be solved by archiving the picture in a separate system like Picture Archiving and Communication System (PACS)7.
The use of smartphone photography in medical practice is not an uncommon practice. With this DIY guide, smartphone slit lamp anterior segment camera should no longer be seen as something unattainable to ophthalmologist. Instead it should be viewed as an indispensable accessory to slit lamp examination.
Acknowledgements
We greatly appreciate Dr Siti Zaleha Mohd Salleh, Dr Haireen Kamaruddin, Dr Azura Ramlee, Dr Nik Nazihah Binti Nik Azis, Mr Zawawi Zakaria, Ms Maziatul Nor Akmar for their contribution in the creation of iPhone slit lamp cameras.
References
1. Chhablani J, Kaja S, Shah VA. Smartphones in ophthalmology. Indian J Ophthalmol. Mar-Apr 2012;60(2):127–31.
2. Lord RK, Shah VA, San Filippo AN, Krishna R. Novel uses of smartphones in ophthalmology. Ophthalmology. Jun 2010;117(6):1274–1274 e1273.
3. Stanzel BV, Meyer CH. [Smartphones in ophthalmology: Relief or toys for physicians?]. Ophthalmologe. Jan 2012;109(1):8–20.
4. Tahiri Joutei Hassani R, El Sanharawi M, Dupont- Monod S, Baudouin C. [Smartphones in ophthalmology]. J Fr Ophtalmol. Jun 2013;36(6):499–525.
5. Bastawrous A, Cheeseman RC, Kumar A. iPhones for eye surgeons. Eye (Lond). Mar 2012;26(3):343–54.
6. Hester CC. Smart Phoneography – How to take slit lamp photographs with an iPhone. http://eyewiki.aao.org/Smart_Phoneography_-_How_to_take_slit_lamp_ photographs_with_an_iPhone. Accessed 21 September 2013.
7. Picture archiving and communication system (PACS). http://en.wikipedia.org/wiki/Picture_archiving_and_communication_system. Accessed 22 September 2013.